How to Setup Fusemail on Phone?
j2 international is strolling the complete manner of Fusemail and incepted in California. an exceedingly acclaimed unfastened webmail service incorporates many features, not like as many everyday e-mail services. Fusemail has been proven as relatively reliable and helpful that every customer is recommended to have the dexterity at the least as soon as.
How to Setup Fusemail on iPhone?
If you are using Fusemail mail account and have been accessing it through the system then you also have an option to set up the same on an iPhone. Recently officials of Fusemail have developed a standard step by step procedure through which they can easily set up their mail account on the iPhone. Users can simply move down the tutorial to get the things done on an instant basis.
Steps to Setup Fusemail on your iPhone:
- Open your iPhone device and simply launch the mail application.
- When opened then users will need to tap on “Settings” and then they can simply tap on “Mail, Contacts, Calendars”.
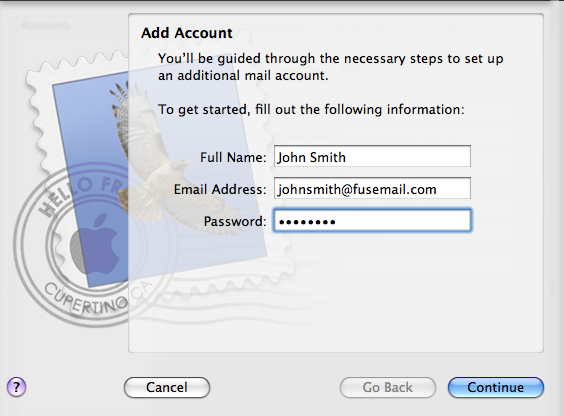
- Users will now be required to tap into “Add Account” and then they will need to select “Other” from the list of available options as Fusemail will not be listed there.
- Users will then be prompted to enter their email address, password and a description for their Fusemail email account which they want to set up on their iPhone.
- Next users will need to enter all the server settings which include the email address, server name, domain, username, and password.
- Finally, users can click on “Save” to save the settings of the mail account and if users have got a success message then the mail account is set up effectively.
How to Set Up FuseMail on Android Phone?
You are urged to follow any of these processes in order to configure FuseMail on your android phone. Both the ways; i.e., automatic configuration and manual configuration have been given here. FuseMail experts have has broken both the methods into multiple steps. Due to their immense simplicity, you are open to following any of them. If it has not done yet, configure your account today.
Automatic Configuration
- Open the [Home Screen] of your android device.
- Navigate the [Menu] button now.
- Choose [Settings] and [Accounts].
- You are now suggested to tap the [Add] key.
- Go to the bottom section of your screen.
- Here you need to select the [Microsoft Exchange ActiveSync].
- Enter your primary email address along with the password.
- Click [Next] to activate the [Auto Discover].
- Allow it to work few minutes.
- It will automatically configure your account.
Manual Configuration
- Start it by pressing the [Manual Setup] icon.
- Domain\Username: Type a backslash and your email address; i.e., \user@domain.com
- Password: Type your mailbox password
- Server Name: west080us.exchange.fusemail.net
- User Secure connection: checked.
Click [Confirm] if prompted; it will confirm the server administration. Now you are suggested to set account options to get desired configuration. Move towards the next page. Specify a unique local account name for the mailbox (i.e. My Work Email). Remove your previous ActiveSync account now. Call on FuseMail help number in case of any confusion or query related to the account configuration process. It is known for its helpful attitude and effective support.
LEAVE COMMENTS